Hello and happy return! Today we’re going to learn How to Do MLA Format on Word. Regarding academic writing, The Modern Language Association (MLA) style is a commonly used format and citation system, especially in the humanities and liberal arts fields. It is crucial to understand the proper format for your documents whether you are a student writing a research paper, an instructor creating course materials, or a professional trying to create documents that meet MLA requirements.
One of the most popular word processors is Microsoft Word, which has capabilities that let you structure your documents precisely according to MLA requirements. However, a lot of people frequently run into difficulties while figuring out the nuances of MLA formatting in the Word program.
Why is it Important to Do MLA Format on Word?
Academic Standards: Academic writing typically follows the Modern Language Association (MLA) standard, especially in the humanities and liberal arts. Following MLA criteria guarantees that your work meets the formatting standards required in academic settings.
Credibility and Professionalism: Using MLA format shows that you are a detail-oriented and professional person. Maintaining consistency in formatting shows that you have taken some time and care to communicate your thoughts, which increases the trustworthiness of your work.
Uniformity and Consistency: The MLA format offers a structured system for font styles, formatting margins, source citations, and other components. Maintaining consistency in academic work is possible by keeping all of your documents uniform, which facilitates navigation and understanding for readers, instructors, and researchers.
Preventing Plagiarism: The MLA style offers precise instructions for appropriately attributing ideas and information to their original authors. Giving credit where credit is due and avoiding accidental plagiarism are two benefits of doing this.
Ease of Reading and Evaluation: A text with consistent formatting is simpler to read and assess. Following MLA style guarantees that your work complies with the specific expectations that instructors have for the structure and look of documents in academic settings.
You may also like>>> How To Make A Pamphlet On Microsoft Word [2 Methods]
How to Do MLA Format on Word
We’ll walk you through the process of formatting your essays and papers in Microsoft Word by MLA style in this step-by-step tutorial. We will begin with organizing your work and then assist you with correctly citing your sources. At every stage of this guide, we’ll provide helpful advice and insights. After you finish reading, you’ll have the information and abilities necessary to generate papers that follow MLA criteria with confidence, saving you time and guaranteeing that your work satisfies strict academic requirements. Now let’s get going!
How to Do MLA Format on Word – Doing Manually
We will tackle every prerequisite one by one, so let’s start at the top and work our way down.
These are some fundamental MLA rules.
- Make all of your margins one inch.
- Choose a readable typeface, such as Times New Roman.
- Use a font size of 12.
- Double-space every word in the document.
- Put an indentation at the start of every paragraph.
- Add a header to the upper right corner of the document that shows your last name and the page numbers.
- Your name, paper details, and the date should appear on the first page.
- On the first page of your paper, your title should be in the center.
- A Works Cited page with MLA citations should be included at the conclusion of the article.
Step 1>
Select the tab for Layout.

Step 2>
Click Custom Margins after selecting Margin.

Step 3>
Type 1 and hit Enter for the Top, Bottom, Right, and Left margins.

Step 4>
Click the “Home” tab.

Step 5>
Choose the Times New Roman typeface (or a comparable font, such as Calibri) by clicking the font drop-down option.

Step 6>
Choose 12 from the font size drop-down menu by clicking it.

Step 7>
Click on the drop-down menu for spacing. This icon appears as four horizontal lines with blue up and down arrows between them. Press 2.0

Step 8>
Choose a Paragraph by right-clicking on the document.

Step 9>
Verify that the Indents and Spacing tab is active. Select First Line from the drop-down menu under Special. Click the By field and enter 1 cm.

Step 10>
Select the Insert tab.

Step 11>
Choose Header from the Header & Footer menu, then choose Blank (the first choice).

Step 12>
Type your name in the header and hit the spacebar once. Next, select the “home” tab. Click on the Paragraph section and choose Align Text Right.


Step 13>
Click in the header following your name to change the page numbers. Choose the tab for the header and footer.

Step 14>
Choose Page Number, click Current Position, and then choose Plain Number.

Step 15>
Now that you have your formatting set up, let’s add the crucial information to your document’s opening page. This usually consists of the following: the date, which should be recorded in the day, month, and year format; your complete name; the course name; the course number; and the name of your teacher. These specifics provide a suitable introduction for your document.

Step 16>
Once the date has been entered, type the title of your document or research paper and hit the Enter key. Then, center the text by selecting Align Text Center from the Home menu.

Step 17>
Citations that you include in your work must also follow the guidelines set forth by the MLA Handbook. Choose your selection of citations, then right-click on your document and choose Paragraph. Choose Hanging from the drop-down menu under Special in the Indentation section, then click OK.

It is now time to begin writing your MLA paper after you have properly prepared it under the rules. Following this formatting instruction should make it easy for you to comply with MLA regulations. Make sure everything is in order by carefully going over your document before submitting it!
How to Do MLA Format on Word – Through Microsoft Word template
Writers can easily use the publicly available MLA templates in Microsoft Word. Word will automatically format your material according to MLA criteria if you simply load the template.
Step 1>
Launch the Microsoft Word program.

Step 2>
Press the “More Templates” button.

Step 3>
Enter “MLA format” in the search area.

Step 4>
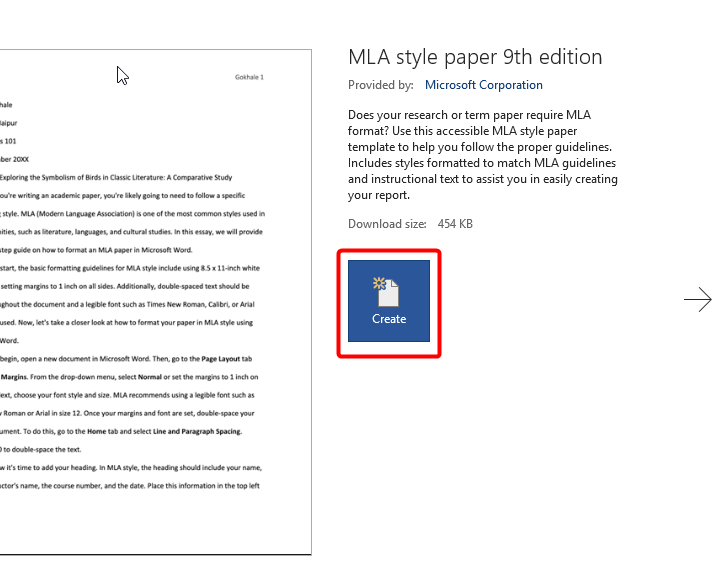
Choose the template for an MLA style paper.

Step 5>
After you click “Create“, Microsoft Word will produce an MLA-formatted generic essay.
Step 6>
Add pertinent and significant information for your essay or article. (Name of the student, name of the teacher, course, and date).

After making all the necessary preparations, it’s time to begin writing your essay. Alternatively, you can manually set up this formatting and store it as a template for an MLA paper. It’s crucial to keep in mind, though, that some teachers might have particular guidelines. It’s a good idea to regularly review the requirements in your writing manual and make sure you follow them.
You may also like>>> How To Make A Word Cloud In Microsoft Word [2 Best Methods]
Frequently Asked Questions
Does the MLA format apply to all kinds of documents?
While the fundamentals of MLA format are constant, particular requirements for other document kinds, including research papers, essays, and bibliographies, may change. For any document-specific requirements, always refer to the most recent edition of the MLA handbook.
Can I format non-academic documents in MLA style?
The primary purpose of the MLA format is for scholarly writing. Depending on the situation, choose a more appropriate formatting style, like Chicago or APA, for non-academic documents.
How should many authors’ in-text citations be formatted?
Use each author’s last name in the in-text citation when using MLA format. Consult the MLA handbook or style guide for additional information on formatting in-text citations for multiple authors.
When citing a source without giving credit to the author, what should I do?
Use a succinct title or a descriptive term in the citation if the author of the source is unknown. For detailed instructions on managing sources without authors, consult the MLA manual.
Do research papers need to have a cover page in the MLA format?
MLA standards state that a separate cover page is usually not necessary. But always adhere to the precise guidelines provided by your teacher or organization.
Conclusion
So, today we learn how to do MLA format on Word Proficiency with MLA format within Microsoft Word is crucial for writing in academic and professional contexts. Important topics including text formatting, header modification, page setting, and correct source citation were covered in this guide. You will improve the caliber and professionalism of your work by adhering to these guidelines. I value your reading, and I hope you will use MLA guidelines and be clear in all of your future writing! Thanks.