We will learn how to add animation in Google Slides in this tutorial. In order to capture the attention of the audience, a presentation needs to be visually appealing. Fortunately, Google Slides has a number of features that you can use to build dynamic presentations. Animating the elements on the slide is one technique to make your presentation stand out. Using animation, you may add movement and fade in and out of your object on the slide. It facilitates bringing the main elements to the audience’s attention. Additionally, experts advise incorporating animation effects in presentations because they significantly increase the memorability of the content. Consequently, it’s a fantastic method to dazzle your audience and make a lasting impression.
Therefore, the goal of writing this article is to instruct you on how to add animations in Google Slides. If you learn how to add animations to Google Slides, you can breathe new life into still photos. To reach the milestone, you simply need to follow a few simple actions. We have broken down each step in this article so that you can most readily understand how it works. Read this article through to the end to find out how to add animations to Google Slides if you want to improve your presentation and maintain audience engagement over time.
Benefits of Adding Animation to Google Slides
Draw Interest: Animations capture the audience’s attention and are a useful tool for drawing their attention to particular slide sections. This is particularly helpful for outlining main ideas or crucial details.
Appeal to the Eyes: Your presentation will look better with animated features, which also give it more intrigue and energy. Animations add a clean and expert appearance, whether they be simple transitions or more complex effects.
Highlight Important Points: You can use animations to draw attention to and accentuate important elements in your presentation. You may make sure that the people in your audience understand and retain key information by using entrance or focus animations on important sections.
Flowing Changes: Animations that transition between slides provide a fluid flow and avoid sudden changes in direction. This helps keep the audience’s attention on your material and also gives the impression of being more professional.
Improvement of Storytelling: Your presentation’s storytelling element can be strengthened with animations. They can be employed to progressively reveal information, build suspense, and assist in directing your audience through a story.
You may also like>>> How To Make A Table In Google Slides [Complete Guide]
How to Add Animation to Google Slides?
Just as with transitions, adding animation to Google Slides is really easy. However, Google Slides gives its customers some more alternatives to create presentations that are polished for the slides. With a set of examples, let’s go to the procedures for seeing each of these capabilities while using animations in Google Slides.
Step 1>
As we see, animation is applied to a variety of slide elements, including shapes, text, and images. So, to add animation, select a slide that has several items on it. Below are some text, a shape, and a logo image. Now let’s explore how to add animation to these items.

Step 2>
If you wish to add animation to an image, choose the image first. Otherwise, choose the object you want to animate first.

Step 3>
The Google Slides toolbar will have a “Animate” button at the front when you select any object in your presentation. as seen in the image below. Press the button.

Step 4>
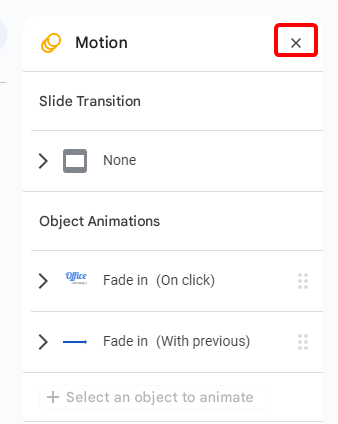
The “Add animation” button allows you to add animation to the object you have selected in your slide when you click the animation button. This will open a new side pane window on the right side of the window.

Step 5>
After selecting the “Add Animation” button, more animation will appear. To choose your favorite animation that best fits your object, click the arrow as seen in the picture below.

Step 6>
Google Slides has a variety of animation patterns for the in and out of the object. As you can see from this list, each animation style is for both in and out, so you can select an animation for both entering the object and leaving the slide.

Step 7>
Once the object’s animation has been chosen, you can change its duration by using the functions for the object’s inward and outward motion during the slide show.

Step 8>
Prior to the animation timing function, there is an additional choice that allows you to click with the prior, after the previous, and before the previous. It is now set to the “On click” option. This implies that a second object will enter or exit when you click or press a button.

Step 9>
You are almost finished. You can click on the “Play” button to get a preview of the object animation.

Step 10>
Let’s give one more object some motion before moving on to a slideshow. I’m choosing text to apply animation to this time. Let’s now launch the animation window by selecting the animation button found in the Google Slides toolbar.

Step 11>
I’m choosing the animation style for my slide’s text object right now.

Step 12>
I’m going to cut down on the animation time now so that my text appears on the slide slowly, giving your slide the perfect presentation style.

Step 13>
You will see an additional option here called “By paragraph” when we apply motion to the text. You can animate your text paragraph by paragraph with this option.

Step 14>
I have applied animation on the object “arrow” in the same way now we should be able to animate our slides object, so let’s exit the animation window and proceed to the slideshow to see how Google Slides handles animation.

Step 15>
At the top of the Google Slides window, right next to the share button, is a large slideshow button that you can click to start your presentation’s slideshow. Press it to initiate the Slideshow.

Step 16>
Below you can see, the result shows how exquisitely our objects fit into the slides to present them, adding to the presentation’s visual appeal. For the image, and object we chose to “Fly in from Right‘’ and for the text we choose “Fly in from Bottom” respectively. Thus, as the image appears, it flies, and when you click on it, text appears flying from the window’s right side. Likewise, you can enhance the presentation of your slides by incorporating various forms of animations into your items.
You may also like>>> How To Change Text Color In Google Slides [2 Ways]
Frequently Asked Questions
Does Google Slides offer any pre-made animation templates?
Of course! A range of pre-made animation templates are available in Google Slides. To get to them, pick an element, choose “Slide” > “Transition“, then click “Effect Options“. This function simplifies the animation process by providing a selection of expertly created effects.
Is it possible to put audio into Google Slides animations?
Although you can’t add sounds directly to animations in Google Slides, you can still get a comparable effect by including a sound-enabled video. If you insert a video file, the sound and the animation will sync during the presentation.
Is it possible for many animations to play simultaneously?
Tastefully placed animations and transitions enhance the presentation’s visual appeal. It can need a location to animate multiple objects to grab the audience’s attention. You can animate several items and enhance the visual appeal of your presentation by using the techniques and examples that follow, as the final result will demonstrate.
Step 1>
As I’ve specified below, pick every object you wish to animate simultaneously.

Step 2>
Next, click the “add animation” button to open the animation window and add animation to these objects.

Step 3>
Next, you need to decide the animation to use for each and every object. For each of these objects, I have chosen “Fade in” animation here.

Step 4>
You can now see that every object you had placed in the presentation is animated in the animation window. The characteristics of the other two objects are changed to “with previous” once the first object begins to animate on click. In this way, when you click on the first object, it will animate along with the other two things.

Step 5>
This is the result of how wonderfully every object is animating simultaneously and looking beautiful.

How do I remove Google Slides animations?
Since Google Slides is a sharing program, numerous users can collaborate to make a single presentation. In that scenario, someone likely added an animation to your slides that you don’t like. If so, you can easily delete it by following these simple steps. This will not affect your presentations in any way. Let’s investigate the removal of animation from Google Slides.
Step 1>
Navigate to the animation pane menu after selecting the object you wish to remove from the animation.

Step 2>
Click on the object that has been animated in this section.

Step 3>
To remove the animation, simply click the trash button that appears when you click on your object, as seen in the image.

Step 4>
Your object has disappeared from the animation pane window, as you can see. This indicates that your object is now animation-free; just dismiss the window and enjoy the show.
You may also like>>> How To Insert A PDF Into Google Slides [2 Simple Steps]
Conclusion
So, we have learned How to add Animation to Google Slides. Your Google Slides presentations will become more dynamic and engaging when you use animations. Each element’s animation can be customized, their speed can be adjusted, and you can easily preview your visual story. Despite the indirect nature of sound integration, using videos improves the auditory experience.