Hello, today we are going to learn how to record a presentation on Google Slides. There isn’t yet a straightforward way to record a presentation in Google Slides. To record a presentation on Google Slides, we use third-party add-ons, browser extensions, and external plugins. Finding a solid tool and learning how to use it as your main video recorder to record a presentation on Google Slides, however, is a laborious task. Since there are dozens of video-capturing tools on the market, people tend to avoid downloading and testing new ones. While most of them are free to use and don’t require a watermark, others are premium and require payment.
Locating them and adjusting to the user interface, however, is a challenging task. I did some research and found a very practical and user-friendly video editing application to help you record a presentation in Google Slides so you won’t feel stressed. The tool we’ll be using in this lesson doesn’t leave a watermark on the video and is totally free. When presenting, we have the option to record our faces in addition to the presentation or to switch off the video and just record the screen. We can also enable and disable audio. I’ll show you whatever tool I have for you today and how to use it to record a Google Slides presentation.
When We Need to use Presentation Recording on Google Slides?
These days, the majority of the distribution outlets for educational materials and company presentation investor decks are online. There are two kinds of Google Slides presentations. The first kind doesn’t require a presenter to be there. On the other hand, the latter kind requires a presenter. A spokeswoman was needed to address the points raised in the presentation in less than satisfactory presentations, while others were jam-packed with information and abundant in examples and explanations. Therefore, we can share a presentation immediately in the.slide format for online distribution. However, it won’t be communicative. Thus, the necessity of recording presentations arises.
We have the ability to record a presentation within a video, including our voiceover, and even include a webcam video. The audience will then find it quite easy to comprehend the slides’ content. We can choose to have our faces hidden or shown in the video, and we can only narrate the presentation in order to distribute it in video format. Now that you are aware of all the details, you may be wondering why it is necessary to understand how to record presentations on Google Slides.
You may also like>>> How To Make Jeopardy On Google Slides [Educating Game]
How to Record a Presentation on Google Slides
To record a presentation on Google Slides, we will use a third-party software. To get started, we will download and install the app, set it up, log in, and use its features to record a presentation. We’ll go over everything that’s crucial, and I’ll do my best to explain the main functions and practical elements of the program we’ll be using.
Screencastify Chrome Extension to Record Google Slides Presentation Screen
This first section explains how to record a presentation on Google Slides. It’s a free screen recording and video recording tool that supports webcams and has a microphone. It is essentially a Chrome plugin that works in the same way as any other browser extension once it is added to Chrome. It is free and allows us to capture videos, edit them, and then share or download them in high definition, watermark-free. So many characteristics, huh? Let’s explore how to obtain this and record a Google Slides presentation using it.
Step 1>
Use your Chrome or Chrome-based browser to search for Screencastify.

Step 2>
To visit Screencastify’s official website, click the first link.

Step 3>
Select “Add to Chrome.”

Step 4>
The Chrome web store will be the next page you see. Select “Add to Chrome.”

Step 5>
There will be a browser notification, After reading the provider’s message, select the Add extension option.

Step 6>
The files will download and automatically appear in the toolbar of your Chrome browser. This process may take some time.


Step 7>
Return to Slides and launch the presentation you wish to record.

When you click on the extension, a new tab with login and account setup options will open.

Step 8>
When prompted for permission, click the Enable microphone and webcam button to turn them on now. Alternatively, you can choose the Maybe later button to turn them on later.

Step 9>
You will be redirected to the signup page since I have already signed up. You will see this page.

Step 10>
I’m going to close this tab and return to my presentation.

Step 11>
To start the recording, click the icon of the screencastify extension.

Step 12>
The main menu for starting recording is shown below.

Step 13>
After choosing the browser tab, click the “Start recording” button.
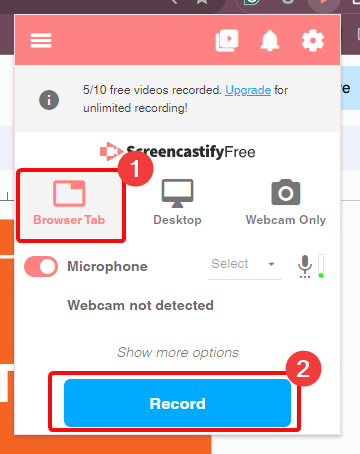
Note: The two options before the “Start recording” button can be used to activate the webcam and microphone.
Step 14>
The moment you press the “Start recording” button, a countdown will begin.

Step 15>
Watch the entire process in the GIF file below.

Once your video is complete, click the stop symbol in the toolbar’s left corner.
Step 16>
Below is a toolbar that is checked; although it may irritate you, it is rather helpful. It can be used for drawing, Or you can stop/pause recording using this toolbar.

or
Press the Ctrl + Shift + R shortcut key.
Step 17>
You can move the toolbar freely while it’s expanded or minimize if you find it bothersome.

Step 18>
A new tab will instantly connect you to your screencastify account after recording the video.

Step 19>
These are the sharing options available to you.

Step 20>
This file can be downloaded by using the download link located in the Export section.

Step 21>
Alternatively, you can click the Edit button to edit your recording in the left side panel.

Step 22>
You can edit recordings with this free screencastify editor and apply stylish effects, transitions, and filters.

I won’t delve into the editing tool’s specifics here. It’s a pretty basic tool that anyone familiar with basic video editing software may use with ease.
We can capture in two or three takes and produce a flawless version of our recording, so we don’t need a recording to edit. Nevertheless, the editor can be used very easily and for free if someone requires it. This is another reason not to discuss it further.
Using Screencastify to Record Your Self Video with a Google Slides Presentation
Now that we’ve recorded a video using the Screencastify extension, let’s take a brief look at how to record a presentation on Google Slides and create a self-video that goes along with it. It’s quite simple and similar to what we learned in the previous section before; all we need to do is grant access to our webcam and microphone so we can use voice-over, as well as add webcam video to the presentation screen. Let’s find out how it’s done swiftly.
Step 1>
From the toolbar of the Chrome browser, launch Screencastify.

Step 2>
Select either Setup Camera Access or Setup Microphone Access.

Step 3>
Once there, you’ll see a new Chrome tab with the icon “Enable mic and webcam.” Click on it to continue.

Step 4>
There will be a browser alert; select authorize to authorize access and proceed.

Step 5>
After seeing a success message, return to your extension to resume recording.

Step 6>
The Microphone and Embed Webcam toggle buttons are now visible for you to turn on or off.

Step 7>
Now that the toggle buttons are active, select the Record button.

Step 8>
Your face will appear on the bottom right of the video recording, your tools will appear on the bottom left, and you can use the remaining screen to display your presentation.

Note: The voice-over was recorded and integrated into the video as well.
I hope you now know how to use the screencastify chrome extensions and record a presentation using Google Slides. It’s an excellent tool for recording presentations. For free video recording of your presentations, I suggest using this plugin.
You may also like>>> How To Add Google Slides To Flipgrid [Best Practice]
Key Notes
- Using the built-in toolbar within the screencastify recorder, you can add text, images, emoticons, and even draw on the screen while presenting your presentation.
- The built-in recorder for screencastify is excellent. To get some decent experience with a video editing program, I will advise you to give it a try and edit a video.
- With the screencastify plugin, you can record your desktop, all active windows, and the tab in Google Chrome.
- By turning off the camera button while the screen is being recorded, you can stop recording at any moment.
Conclusion
Concluding the discussion on how to record a presentation on Google Slides. We discovered it with the help of the fantastic Screencastify Google Chrome addon. Even without a watermark, I adore this Chrome addon for screen recording high-quality videos. You witnessed how flawlessly we recorded our presentation as a video, and we were provided with multiple choices for sharing and editing the captured clip.
Wrapping up our discussion of how to record a presentation on Google Slides. I hope to see you soon for another helpful tutorial. Keep learning with Office Chaser.